Sunday, November 8, 2009

Disabling USB storage driver (USBSTOR)

Hello friends, in this articles I am going to describe you how to disable USB storage devices on your personal computer or your organization network.
Disabling USB storage driver (USBSTOR)
Open registry editor by typing REGEDIT in the RUN dialog box like this.

Locate the registry key

HKEY_LOCAL_MACHINE\SYSTEM\CurrentControlSet\Services\UsbStor\ Start
And change its value data to 4 (Disable).


The main drawback of this method is that, it only works if the USB storage driver is already installed. If it has not, Windows resets the Start value to 3 which enables the USB port again. So, manually you can enable or disable you USB storage device by setting its Start value to 3 (Enable) and 4 (Disable).

If you are “C” Lover then you can also do the above trick by using a snippet of code as below :

// Disabling USB Storage

#include

void main()

{

system("reg add HKEY_LOCAL_MACHINE\\SYSTEM\\CurrentControlSet\\Services\\USBSTOR \/v Start \/t REG_DWORD \/d 4 \/f");

}

// Enabling USB Storage

#include

void main()

{

system("reg add HKEY_LOCAL_MACHINE\\SYSTEM\\CurrentControlSet\\Services\\USBSTOR \/v Start \/t REG_DWORD \/d 3 \/f");

}

Compile the programs. Make .EXE file and distribute it to your friends. Enjoy!!!

Saturday, May 30, 2009

>> Inserting Sample text in Office Word 2007 <<

Hi friends,

After a long span of months I am submitting this post for you. It is especially useful for Microsoft office 2007 user during practical sessions. Many times you need sample text during practical of Word 2007. Many user type their favorite text and then perform their practices. But, after this point forward, if you want sample text , don’t type it and waste your time, simply use rand() function of Word 2007. Here is how you can use it.
Using rand(): To insert sample text in your Word 2007 document , type =rand() in the document where you want the text to appear, and then press ENTER

The sample text that is inserted resembles the following text:
“On the Insert tab, the galleries include items that are designed to coordinate with the overall look of your document. You can use these galleries to insert tables, headers, footers, lists, cover pages, and other document building blocks. When you create pictures, charts, or diagrams, they also coordinate with your current document look.


You can easily change the formatting of selected text in the document text by choosing a look for the selected text from the Quick Styles gallery on the Home tab. You can also format text directly by using the other controls on the Home tab. Most controls offer a choice of using the look from the current theme or using a format that you specify directly.


To change the overall look of your document, choose new Theme elements on the Page Layout tab. To change the looks available in the Quick Style gallery, use the Change Current Quick Style Set command. Both the Themes gallery and the Quick Styles gallery provide reset commands so that you can always restore the look of your document to the original contained in your current template".


You can control how many paragraphs and lines appear by adding numbers inside the parentheses of the rand() function. The =rand() function has the following syntax:

Syntax : =rand(p,l)

Where, p is the number of paragraphs, and
l is the number of lines that you want to appear in each paragraph.

The following are some examples that show how the parameters work:
=rand(1) inserts one paragraph with three lines of text in the paragraph.
=rand(5,10) inserts 5 paragraphs with 10 lines of text in each paragraph.


The parameters are optional. If you omit the parameters, the default number of paragraphs is three, and the default number of lines per paragraph is also three.


Those who are still using the older version of office 2007 i.e. Office 2003 and other version of office can also use the older version of rand function.
To insert sample text that is compatible with Microsoft Office Word 2003 and earlier versions, type =rand.old() in the document where you want the text to appear, and then press ENTER. The sample text that is inserted is as follow :


“The quick brown fox jumps over the lazy dog. The quick brown fox jumps over the lazy dog. The quick brown fox jumps over the lazy dog.


The quick brown fox jumps over the lazy dog. The quick brown fox jumps over the lazy dog. The quick brown fox jumps over the lazy dog.


The quick brown fox jumps over the lazy dog. The quick brown fox jumps over the lazy dog. The quick brown fox jumps over the lazy dog."


You can control how many paragraphs and lines appear by adding numbers inside the parentheses of the rand.old() function.
The function has the following syntax:
Syntax : =rand.old(p,l)
Note In this function, p is the number of paragraphs, and l is the number of lines that you want to appear in each paragraph.
The parameters are optional. If you omit the parameters the default number of paragraphs is three, and the default number of lines per paragraph is two.
******


Tuesday, March 17, 2009

*** Dual Boot Adjustments ***

Most of the Windows users use dual boot operating systems in their system. The most commonly used dual boot Operating Systems are Windows Vista and XP. Some users use Windows 2003 and Windows XP on their system. And still some are using Windows XP and Windows 98 on their machines. The most obvious reason for still using Windows 98 as an OS is compatibility issue. Some software such as older version of Shreelipi (pirated as well as licensed ) and others runs only on Windows 98.

In this topic I am going to discuss some simple but must know issues for every Windows Dual Boot OS user. Most of the computer geeks already acquainted about this but most of the users are still unaware of it. In this topic I want to discuss about following issues:
1) Setting default option for OS.
2) Changing order of menu items in OS selection menu.
3) Setting startup delay.

Setting default option for OS : I am considering that your one of the OS is Windows XP and other OS is Windows 98. Start Windows XP if you have not already stared. Click on Start -> Run. In the Run dialog type msconfig and press Enter. System Configuration Utility window appears like this :

When you start computer, boot menu appears. If you do not select any OS in this menu, then after 30 seconds automatically one of the OS (either Windows 98 OR Windows XP) gets automatically stared. This is default OS selection. Suppose your default OS is Windows XP and you want to set Windows 98 as your default OS. Then click on the option C:\=”Microsoft Windows” the screen appears as below :
Now Click on Set as Default option.

Changing order of menu items in OS selection menu: This is very easy task. Just click on the appropriate menu item and the click on Move Up or Move Down button.

And then click on OK.

Setting Startup Delay : This is set to 30 unless you make a change. To setup startup delay, simply type the value of delay in Timeout text box.

Another way to configure this most commonly edited settings is to open the Start menu, right-click on "My Computer" and choose "Properties" from the context menu. The System Properties dialog box will open as shown below. In the section "Startup and Recovery" click the button "Settings".

The another dialog appears which shown both the Timeout setting and the default operating system settings. These settings can be changed here.


To add or delete an operating system or program from the boot display menu, use the "Edit" button on the right of the entry "To edit the startup options file manually, click Edit" as shown in the figure below.

You can also do these task using comand line. Take a help on bootcfg by typing bootcfg /? on command line. Best of luck !

Friday, January 30, 2009

>> Don’t get full around Access 2003 and Outlook 2003

My friend Jitu and my younger brother Yogesh told me that they have installed MS-CIT Exam Demo V. 2.0.1 on various machines having Office 2007 and Office 2003 loaded. But every time when they start exam demo and start attempting practical questions on Access 2007 and Outlook 2007, the Exam demo opens its predecessor version Access 2003 and Outlook 2003. To get kick out this problem they have uninstalled the previous version of office i.e. Office 2003 but it won’t work.

Actually the Exam Demo created by P. C. Technology Pvt. Ltd. Is a nice software created for MKCL. Programming for MS-WORD, MS-EXCEL, MS-POWERPOINT, WINDOWS is real programming and the Exam Demo opens the actual applications (MS-WORD, MS-EXCEL, MS-POWERPOINT, WINDOWS Explorer). So, for this Demo to run successfully, you need to install any version of Office like Office 2000, Office 2003 or Office 2007. And according to your installed version of Office, the Demo opens the latest installed version of Office. For example, if you have installed two versions of Office in your PC say Office 2003 and Office 2007 then Demo opens newer version of office i.e. Office 2007.

For other applications i.e. MS-Access, MS-FrontPage and MS-Outlook they have created .SWF files. The file format SWF (acronym of "Small Web Format") can be generated from within Macromedia Flash. So just follow me to check out the secret of these files.
Right click on the Exam Demo icon on the desktop.


Popup menu appears. From the popup menu, select properties. The shortcut properties dialog appears on the screen.


Now, click on the command button Find target. Another windows appears and shows the location of the application Exam Demo. In our case it is D:\Program Files\MSCIT Demo Exam. Look at the figure below.

Now double click on the folder name files. This will show the contents of the folder as below :


Observe that most of the files are having extension .SWF. Now right click on any one of these file and select Open with… option. It presents the following screen:

Now click on the select the program from list option button and the click on OK. Another dialog box appears as below :


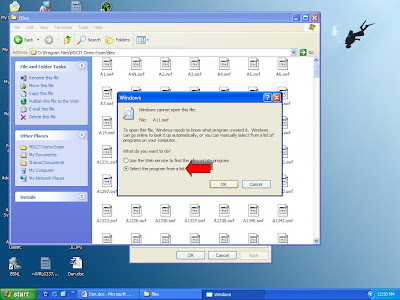
Notice that, by default form the Recommended Program groups the option Internet Explorer is already selected. Click on OK.

Security warning appears below the address bar. Right click on it and from the popup menu select Allow Block Content… .


Selected SWF file now opens. Move your mouse on the image and try experimenting to click on the various parts on the screen. Now try right clicking the image and you know why you need flash player to run this Demo.

So, now no more installation and uninstallation. After all, Life is adjustment, adjust it.

Wednesday, January 21, 2009

When Turbo C/C++ takes more time to start...

Many times I have observed that Turbo C++ 3.0 ( Mostly used Turbo C++ compiler, used by almost everyone C/C++ programmer) takes time to load when you start it. Look at the screen shot below to remove all your doubts about which version I am talking about:


The message “Loading desktop…” flashes on the status bar of Turbo C++ editor. Most of the computer users think that its system maintenance time. They start their job by removing temporary files in their output directory, removing unwanted temporary files, defragmentation of volume and may be check system for virus attack. After doing all these dirty jobs when again they start Turbo C++, they realize that they have wasted their time as the problem remains as it was.
The solution of this problem is quite simple. Just log onto your Turbo C++ directory and remove the file TCDEF.DSK. Now try starting Turbo C++ and njoy.

Saturday, January 17, 2009


[Note : This topic is dedicated for all ALCs of MKCL.]

Worm server is a best software ever made by MKCL. I really want to congratulate MKCL for creation of such wonderful and amazing series of software like LMS, Worm Sever/Client and Bizclient.
After creation of ALCs (Authorized Learning Center), it is mandatory to send the configuration of all PCs to MKCL server. The first step of this process is to install Worm Server on Server machine (Dual core having at least 2 GB of RAM, 160 GB of HDD etc.) and Worm Client on client machines (PIV having at least 1 GB of RAM, 160 GB of HDD etc.). During this process, I face the following error when working with Worm Server.
The error message was,
“Unhandled exception has occurred in your application. If you click Continue, the application will ignore this error and attempt to continue. If you click quit, the application will close immediately.
Object error not set to an instance of an object"


This error pops up specially when working with branded machine. Before installation of Worm software in Server machine we need to install some prerequisites software that are Windows installer 3.1 and Dot Net FX 2.0. After installation of these software and successfully installation of Worm Server, when I started worm server this error occurs. After that I install Service Pack 2 as a possible remedy for this error but it doesn’t works. So, I am sharing the remedy of this problem with you.
Actually this error occurs due to improper installation of device driver or if you do not install device driver for any device. To get rid of this error simply install all the drivers for your PC or disable the device having no device driver. The first method is a complete solution and it is recommended method. Second method also work but it is partial solution for this problem. So It is totally up to you which method is best suitable for you.

Good luck !

Friday, January 16, 2009

Create DVD from CDs ( for MKCL ATCs)

Hi friends,
[Note : This topic is dedicated for all ALCs of MKCL.]
Windows vista installation is very tough job even if all your systems are connected to each other through LAN. As you need separate CD drive for all PCS to install Windows Vista. Another thing is that we have set of 4 CDs and if anyone CD of this set is get corrupted then this installation became nightmare for computer user. In this topic I will guide you how you can make your Vista installation easy without having CD drive on every computer. But of course you need XP as an OS in every computer.
Best of luck !


Thats all folks !

Thursday, January 15, 2009

>> Shutting the Shutdown Event Tracker

Annoying Shut down Event Tracker
I am using Windows Server 2003 OS from last 6 months. The Windows 2003 server is a new experience for me as I never work with server OS from long time (before this I have worked with Windows 2000 and explore some networking features and server capabilities of it with great fun). But in case of Windows 2003 server I feel awkward to tell you that I am using it as a desktop OS. And in Desktop Operating System restarting or shutting down a machine is a common procedure. So it is annoying for me to pop up Shut Down Event Tracker every time I shut down or restart machine.
According to Microsoft, "The Shutdown Event Tracker is a Microsoft Windows Server 2003 and Microsoft Windows XP feature that you can use to consistently track the reason for system shutdowns. You can then use this information to analyze shutdowns and to develop a more comprehensive understanding of your system environment."
In server environment shutting down or restart the system is not occurred frequently. Therefore, when it is, Administrators should keep a log of exactly why the machine was powered down. This can be a good thing since it allows you to store a database of shutdown events for future reference.
For some special people like me, especially those that use Windows 2003 as a desktop operating system where restarting or shutting down a machine can be a common procedure - it might get to be quite annoying.
When you click on Shut Down option from the from the Start menu, the Shutdown Event Tracker pops up the following dialog box:


The following seven event tracker options are available.
Ø Other (Planned)
Ø Hardware: Maintenance (Planned)
Ø Hardware: Installation (Planned)
Ø Operating System: Reconfiguration (Planned)
Ø Application: Maintenance (Planned)
Ø Application: Installation (Planned)
Ø Security issue.
You can use any options from the above according to your task and place appropriate comment to the comment text box.


Shutting the Shutdown Event Tracker
You can shut the shutdown event tracker using Group Policy Object Editor. To start the Group Policy Object Editor do the following :
Ø Click on Start > Run.
Ø Type gpedit.msc and click on OK.
Ø Select Computer Configuration > Administrative Templates > System
Ø In the right pane, select the “Display Shutdown Event Tracker” setting. Look at the following screenshot:

Ø Double Click this setting to open the Properties page.
Ø Click on the Disabled option button and he click on OK.
Ø Restart the machine.Now try to restart your machine and noticed that, the Shutdown event tracker will no longer be visible.

Hurrey … You did it buddy !